The Barefoot Photographer®

a photography blog

Monday, March 31, 2008

Fernbank

Last Saturday the Fayette Photo Club met at the Fernbank Museum of Natural History. It had been a while since my daughter had been to the museum. She went along – not to take photos – but to wander around and of course hit the gift shop. I admit she was not the only one who hit the gift shop! They had the cutest cuff bracelet with frogs on it – it had to come home with me.


An aside to the museum – but the trees in Atlanta are so pretty right now. On the way home I spotted on Freedom Parkway a group of cherry trees on the side (sort of near the Carter Library) – very pretty! We also got a glimpse at the damage caused by the tornado that went through Atlanta a couple weeks ago. As we neared the intersection of Freedom Parkway and (I forget – but the street that takes you to the King Center, Boulevard?) you get a great view of the Atlanta skyline. We saw places at the Westin and other buildings downtown where the windows that had been damaged have been temporarily covered with what appears to be plywood. The Westin looks like they painted their plywood black to blend more with the windows. This intersection is not far from Oakland Cemetery. The club had a field shoot there last September. The grounds at Oakland also suffered a lot of damage from the storm. I was driving – so I took no photos. When I am a passenger riding through Atlanta – I always take photos.


The night before was spent trying to decide what to bring with me. I could not decide about the tripod or monopod – so I decided to take both. Funny thing is – both stayed in the car! If I had not brought them – you know – I would have wanted them. Then I was thinking about lenses. Did I really want to carry my photo backpack? Would I rather place a lens in a tote and just swap things from my backpack into the tote and my wallet also into the tote? What I came up with was leaving all of my photo equipment in the backpack where it is safest (great padding) and put my wallet in the backp ack. I was glad I did not leave a lens at home – although I did not use one (50mm) I used the other three.


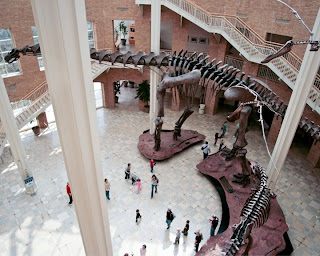
It was a good day for photos. The weather outdoors affects the lighting in the museum so much that you do hope for a good day. The ceiling in the center of the museum is nothing but a giant skylight. One of the draws for me to bring the photo club here was the architecture of the building. The museum has such an interesting structure – all these circles, the stairways, the atrium, the ceiling, the floor filled with fossils – it is all great subject matter. It is almost as important to visit to see the building as it is to see the exhibits it houses. Check out the website www.fernbankmuseum.org for information on visiting.


It is hard to miss the Giants of the Mesozoic exhibit in the main atrium of the building. As you approach the ticket takers the atrium is right in front of you. You can see the 'bones' of the Argentinosaurus. When you look over to the floor below you can also see the Giganotosaurus, the Anhanguera (there is one in flight and one perched on a rock on the wall), and a flock of pterosaurs. The Argentinosaurus is the largest dinosaur ever classified. The Giganotosaurus is the world's largest meat-eating dinosaur. It is larger than the more well known T. Rex.

I remember visiting Fernbank when this exhibit was being constructed. If you visit this link: http://www.fernbankmuseum.org/exhibitions/permanent/giants/dinocam.aspx# you will be taken to a page to select live dino cam shots of this exhibit. Once when I was there with the kids, I called a friend in New York. She saw us on the internet waving to her. What is really cool is that she took a screen shot of her computer at that moment. I have it saved on my computer now. It shows me with the two kids standing the in atrium. We were easy to spot since my daughter had on a bright red shirt that day.


Of course I started out with the Lensbaby. It was great. On my Flickr page I have a couple that I took with the Lensbaby – one close up of the head of the Giganotosaurus. The other is an overhead shot of the flock of pterosaurs. Both of these photos were converted to black and white using Elements. Then I switched to my Tamron 14mm. This lens allowed me to get almost all of the dinosaurs in one shot. It worked wonders on the large atrium. I took photos from each level with it. Some of my favorites were from the upper level looking over the edge to the exhibit below. Before we left I took some with the Tamron 18-250mm zoom. My favorites are a toss up between the Lensbaby (with and without the wide-angle attachment) and the 14mm.


I took a total of 116 photos on Saturday. When I upload photos to the laptop I pay attention to how many there are – and I wonder – OK, out of all of these how many am I really going to like. So far, out of these I have quite a few that I like. I am still spending spare time playing around with them in Elements. This morning I solarized a photo I took of the entrance (on the inside from the upper floor). I like this look for some photos – it is different. So far, I have only put three photos on Flickr. Maybe I will put a few more there.

Tuesday, March 25, 2008

Photographers' Rights, Releases, and You

Recently the photo club went on one field shoot and has another planned at locations where there are restrictive photography policies.  The main point of the policy at either place is simply the photographs are allowed for personal use.  If you plan to use a photo taken at either location for commercial use – a prior written consent must be obtained by the photographer.  It seems simple.  It really is.  And you know what – it applies to more places and people than you think.


If you are taking photos of someone or some thing – in the public – and you are in the public (meaning not on any private property at the time).  You are OK to take the shot.  If you are on private property and asked to not photograph, you have to abide by the wishes of the property owner and put the camera away. 


When you take a photo of an identifiable property or person, you should always get a model/property release.  You never know if or when you may decide to sell the photo.  Take for instance the case of Russell Christoff.  Mr. Christoff won a judgment against Nestle in the amount of $15.6 million.  It seems that in 1986 Mr. Christoff applied to be a model for the company.  He had a photo shoot but nothing ever came of it.  Sixteen years later, he was out food shopping and came face to face with his face on a Taster's Choice jar.  It seems that Nestle had been using the photo, without consent or permission, for years all over the world.  The photo had been filed away at Nestle and the employee who had pulled it to use assumed that there was a model release to cover it.


Same thing could happen with a building or a piece of personal property.  Even if you think you would never want to use a photo – if it is really good – down the road – who knows?  Get that release signed and file it away. 


Some public entities such as museums or zoos publish their photography policy on their website or in the brochure you are handed as you enter.  They are being kind and trying to keep the public informed.  Photographers need to know and should know that even if a set policy is not in writing – it is there. 


Many photographers gravitate to the stock photography market.  Many companies that deal in stock photography are picky about what they will take.  For obvious reasons, photos that contain a trademark or copyrighted item belonging to another party will be rejected.  I was reading over a website for stock to gather a little information for this blog entry.  I noticed that this particular company would not accept photos depicting sculpture or hand-made art objects without the written consent of the creator.  All art is copyrighted just as your photo is.


Did you know that the Empire State Building is trademarked?  Images of this landmark where it is isolated or unmistakably the primary subject are not for commercial use without proper consent.  If your photo is of the New York skyline and it just happens to include the Empire State Building, then there is no issue.  Here is the link to the listing of some other trademarked landmarks, plus more: http://www.imagecatalog.com/copyright_and_trademark.php.


Here is an interesting link to a paper written by an attorney detailing your rights as a photographer.  "The Photographer's Right" -- http://www.krages.com/phoright.htm

You have many rights to take photos – but once you take them, depending upon what you want to do with them, the rights of others may supersede yours. 

Saturday, March 22, 2008

Spring in the Garden

It is that time of year again – time to get the yard spiffed up!


Soon there will be blooms in my yard.  I don't have any early blooming plants or trees (except for the native, weedish varieties) – so it is still just green leaves all around.  The daylilies are coming up all over, the hosta, the butterfly bushes are greening up and I see leaves coming on the hydrangeas.   No too long after we moved to this house I noticed a small patch (about the size of my hand) of wild daisies, Ox-Eye Daisy (Chrysanthemum leucanthemum) in the grass area of the back yard.  The green part looked good and continued to look good all summer, even after my husband ran over it with the mow er.  The next spring when I saw that patch appear, I transplanted it to the flower bed area near the patio.  Now – I have little patches of daisies popping up where I don't want them – in the gravel path, right next to the pond, all over.  I have a hard time bringing myself to spray these with RoundUp.  Sometimes I do – sometimes I don't.  I like to take photos of daisies.


Normally I cut back the butterfly bushes severely in the winter.  I did not do it this year because they did not grow out very much last year.  I guess the drought and the heat did take a toll on them.   This morning when I was walking Rosebud out in the front yard, I was looking over the butterfly bushes out there.  They are sprouting leaves.  I also noticed the Johnny Jump Ups (Viola cornuta) that appear each spring in the pine island are not only there, but blooming.  The Yarrow I planted a long time ago is up and has spread more. 


The couple patches of Shasta Daisies that I bought at Pike's last year are looking good.  And – I have Lamb's Ear (Stachys byzantina) all over the place!  That stuff spreads like crazy!  A neighbor was over one day and spotted the Lamb's Ear.  She said she had been on a field trip with her daughter to the Atlanta History Center.  The guide talked of Lamb's Ear and how back before indoor plumbing, many people planted this soft-leafed, quickly-spreading plant near the outhouse.  And speaking of all over the place – my Lemon Balm (Melissa officinalis) is popping up everywhere I look – it spreads like crazy).  The patch of oregano I planted 10 years ago is huge, lush, and green.


I mentioned the pond (where some of those daisies are growing close by).  I am on tadpole watch.  For a few weeks now, I have been hearing the frogs in the pond – mostly at night, but sometimes during the day.  They make a lot of noise in the daytime when it is raining.  Yesterday I had to go to PetSmart to pick up some cat food – I got the cat food and three new koi for the pond.  I hope the frogs don't eat them – or a heron.  My heron decoy is looking old and worn by the weather.  It is very rusty and needs straightening up.  I put the decoy out after a heron ate my favorite fish.  I had just a plain ol' goldfish – she was huge!  I think that fish was close to a foot long.  Also, I had a beautiful shubunkin – white with a bluish tint, a red spot on its head and a few black spots on the body and long fins.  A heron got them both in one day!


Since the water restrictions are eased slightly, I need to get some zinnia and sunflower seeds.  Last year the sunflowers did nothing – I think a certain chipmunk took care of the seeds and seedlings!  The zinnias were OK – nothing great – but the heat was so bad last year.  Hopefully this year it will not be as hot.  I like having zinnias in the yard – those goofy little crab spiders get on them and they are fun to take photos of.


Yes, the backyard is a mess.  I need to spend some time cleaning it up.  All of the time I put in now will pay off later when I want to go out there to take photos. 


Tuesday, March 18, 2008

The Old Church

Every week I drive my daughter to Hampton, Georgia for a marine biology class.  And every week I pass by this really old, interesting church.  When I pass by the church I think, "I need to bring the camera next week and take some shots while she is in class."  Well, "next week" was this week…


When I put the camera in the car Monday morning I had not even considered the old church.  My main thought had been about flowering trees, bushes, and weeds on the grounds of the place my daughter has class.  I was thinking that they had some Bradford Pear trees and I would get some shots of the multiple blooms with the Lensbaby.  While doing this I would have to hold my breath.  Have you ever gotten close to one of those trees in bloom?  Do the words "three-day old shrimp shells" mean anything to you?  Oh my gosh! those trees smell bad!


Anyway – good for me and my nose – I was incorrect that there were flowering trees or bushes around.  There was a nice crop of henbit growing near the parking lot.  OK – henbit I'll be back.


When I had stopped at the intersection directly across from the old church I immediately thought – I have to come back up here today to take some photos.  So that is where I went first.  The church has a cemetery on three sides of it.  It looks like it is still used – sort of – the sign out front is not very helpful.  But, the sign did have a message on it.  I spotted a garbage can set out on one side of the parking area – yes, I do think it is being used.  The church has the most interesting windows on the front and two sides of what appears to be the sanctuary.  I did not go up and peep int o the windows.  I stood back and got interesting photos of them.  There are two large trees in front of the church – still bare.  These trees' shadows that cast onto the church building were wonderful.  The church is white – painted wood siding.  All the trim is white.  So you have this white building – all the lines of the siding – the arches of the windows – in bright sunlight.  Add on top of all that white and lines the large, reaching shadows of the large old trees.  Yes, these photos begged me to convert them to black and white, so I obliged.  Three of them are on my Flickr page .


Back to the henbit – here is the link to see photos of this weed in various states of growth.  http://www.ppws.vt.edu/scott/weed_id/lamam.htm  If you drove through my neighborhood, just about every yard without a service has it growing strong right now.  The parking lot near the class building has a nice crop of it with a few dandelions sprinkled in.  I went back there after I had walked around the church a couple times.


The henbit was OK – it was good practice for me to get down (and yes I got down onto the ground) and experiment with the Lensbaby; smooshing it, stretching it, bending it, and taking many photos of the purple blooms in and out of focus.  I even got a couple good ones of the seed head on a dandelion about to lose its puff.


This was St. Patrick's Day – I had on green socks – and I got a green grass stain on my jeans.


Monday, March 17, 2008

Floral Photography Workshop

The workshop at the Fayette Art Center on floral photography and introducing the Lensbaby is all set.


April 26 from 10 a.m. to 3 p.m. I will present a workshop on floral photography.  The class will concentrate on macro techniques to give you those big, bold, extra-close images that are so powerful.   You can email me at donna@thebarefootphotographer.com or call the Fayette Art Center at 770-631-2780 to reserve you spot.   The cost of this one-time special class is $75 for art center members and $95 for non member s.


We will begin with a lecture on tips, techniques, and the use of the Lensbaby.  Remember, the Lensbaby is a selective focus SLR lens.  It has a sweet spot of sharp focus – you adjust the composition of your photo to place the sweet spot where you want it.  The rest of the photo is artistic blur.


There will also be time for hands on shooting – so bring a camera.  I will have plenty of flower "models" on hand.  The folks at Lensbabies have promised some demo lenses for those of you with an SLR – you get to try one out before you buy.  And even if you buy one – they give have a 30-day return policy.  After everyone has had time to get their shots – we will put them up with my laptop and projector to discuss what works, what doesn't, and ways to improve – even on the good shots.


If anyone has any questions, please feel free to email me before the class date.  I have some Lensbaby shots on my Flickr page and on my website I have a page dedicated to the Lensbaby.


Friday, March 14, 2008

Lensbaby!

It arrived! All this time I have thought about getting one and did not because I was buying something else, or wondered would I really like it, or thought I would wait and pester my husband for it for my birthday -- well I did not wait or pester. And yes, I really like it…


As soon as the mail appeared in the mailbox on Monday afternoon, I was hooked. I had ordered on Wednesday the week before and skipped springing for the fast shipping since I did opt for the cool T-shirt with "Bend it Baby" on it. Without paying for the faster shipping (the regular shipping was free --- deep down I am a cheapskate about some things). I was at the mercy of the United States Postal Service, an entity which has let me down in the past. Anyway, enough about blah subjects like the mail.


When I opened the box I was surprised at how lightweight the lens was, but then, there is not much there to be heavy. Along with the order for the lens and the cool T-shirt, I had ordered the accessory bundle --- wide angle and telephoto kit plus the macro kit. Admittedly I am one of those people who can entertain herself with a magnifying glass, so I spent a few minutes looking over the accessories. I was paying most attention to the macro kit (because I am a macro freak) and they are like little magnifying glasses for your lens! The coolest part --- you can stack them! Now for the scary part…


When I got to the lens inspection I found the most curious-looking piece of equipment. It looked like a film canister cap fused to a fake fish bait (you know those bumpy, plastic nightcrawlers? Oh you don't know? I guess you did not have a granddaddy like mine.) Anyway, I wonder and flip open the cap to find the most amazing set of washers with varying sized holes in the middle. Then I think to myself, where are the instructions? And then I think – when the heck was the last time I read instructions??? Ladies and gentlemen, those fantastic black washers are my aperture! Oh my gosh --- at that point I am wondering am I in over my head. And the nightcrawler is housing a magnet to assist you in the switching of your f-stop from whatever to whatever.


At this point my wiser-than-he-needs-to-be husband asks me am I stepping back in time and when am I going to get one of those new-fangled flash bulby things that pops the hot bulb out after it flashes. Umm, hey look it's the Golf Channel...


But you know, as intimidating as this gizmo could be to the beginner, intermediate, and some advanced photographers, it doesn't take long to get in the groove with it. As soon as I figured what all the pieces were about and what I needed to play with, I started taking ultra (or is the new word "uber") macro shots of some daisies I had in a vase on my kitchen counter. It was very interesting to have a slice, a piece, a small section of sharp in the frame and the rest kind of slides off. Those daisy shots are some of my new favorites. I have printed out three of them 10x15 and am contemplating having them framed for my wall in the foyer. Oh, yeah, I converted them to black and white too -- love them!


So the Lensbaby arrived! The birthday was March 10, 2008 --- I need to send announcements. Well, here is an announcement for you: I am talking with the Lensbaby people in wonderful Oregon - they are SO nice. I am adding the Lensbaby to my upcoming spring floral photography class. In the future I am thinking of a solid, just plain old Lensbaby class, nothing else --- all day Lensbaby. And guess what? Those wonderful people in Oregon are offering to send to me loaner Lensbabies for the people in the class to try out. How cool is that? Keep a check here and on my website for details that will pop up soon. I am heading out today to nail down the date, time, and place. Just keep thinking --- Bend it Baby!

Tuesday, March 11, 2008

The Orton Effect

While I was preparing class materials one day last week I happened upon directions for The Orton Effect with Photoshop Elements. Hey! I have Elements - I wanted to give it a try.

The Orton Effect is a photographic technique named after Canadian photographer, Michael Orton. He developed a "look" by sandwiching two photos (he was using slides) of the same image to give a dreamy effect. The first image is sharp but overexposed. The second image is out of focus and slightly overexposed, but not as much as the sharp version.


Here are the steps to get this look for your photos. I am using Photoshop Elements. I have seen steps posted on the internet for a how-to-do with Picasa. First ,you have to decide what photo you wish to use. I have found that landscapes - especially those with a lot of foliage, trees, sunlight, and even fall colors -- take on a Maxfield Parrish type of a look. The look also reminds me of diffuse glow -- but not exactly.


Ok, so you have your photo selected. Create a duplicate copy and name this one "Sharp." (I usually never take the time to name layers --- doing this I did to keep them straight.) Create a copy of the sharp layer, it will be named "Sharp Copy" by default. Change the blending mode (that pull down menu in the layers palette where you see the word "normal") to "screen." This will lighten the photo.

After the "sharp copy" has been lightened, you need to merge the two layers. Right click on the "sharp copy" and select merge down from the menu that appears. Make a duplicate layer again, this time name it "Out of Focus." Go to the Filter section, choose Blur, and go to Gaussian Blur. Elements gives you some control here over how much the photo is blurred. The instructions I found suggested blurring to leave visible shapes but no detail.

Once you have your blur level selected head back to the blending mode in the layers palette and select 'multiply.' You can change the appearance of the final product in a couple different ways. You could start with adjusting the opacity of the out of focus layer. Another photo I worked on over the weekend, I desaturated the sharp layer, and I did this after I had completed the entire process. It gave my photo an interesting look. You could tweak this process in many ways to get something that you really like.


There are some other examples of the Orton Effect on my Flickr site. Also, there are some Lensbaby photos. Yes! The Lensbaby arrived yesterday; more on the Lensbaby later.

Thursday, March 6, 2008

Flickr

I finally got around to looking into a Flickr.com account.  I don't know what has kept me from this – oh wait I know – I had other things to do.


A few people I know have Flickr accounts and love it.  I loved it once when I peeped at the site and saw an amazing amount of great photographs.  You could spend days browsing there.  So – to keep you from hunting – I will give my page link right here.      <grin> http://flickr.com/photos/thebarefootphotographercom/


The biggest reason I decided to do this was to create a space for the photo club.  We have some members who have a hard time making meetings.  By creating this space on the internet – they can keep connected to what is going on, share photos, and comment on photos from members who do make most of the meetings.  Also it would help the group to share photos from shoots – like last weekend at Spivey Hall.  The photos taken on that group outing can be posted to the site for critique and discussion.


I will admit – most of the discussion going on there now is how to get a cool looking buddy icon instead of the gray blockhead provided by Flickr.


When I created the group site I chose to have our photo pool open to the public.  The members seem to be OK with that.  I did, however, choose to keep the discussion area of the group space private.  The group is also a "private group" meaning that I need to send an invite to someone prior to them becoming a member.  The only invites I have sent is to photo club members.  The members I talked with about this are pleased with the privacy of discussion.


As I wrote in a blog before about "building it and they will come," the group spaces on Flickr are testaments to that.  You can find a group (or two) on just about any subject.  I have seen group names like "I Ate This," "Vanishing Points," "Running with Dogs," and a bunch of groups about water drops.


Check out Flickr.com for yourself.


Sunday, March 2, 2008

Photo Club at Spivey Hall

Spivey Hall is a world-class performance hall located on the campus of Clayton State University in Morrow, Georgia.

Spivey is considered one of the best small halls in the United States. The acoustics are excellent. Along the side walls are curtains of heavy fabric that are opened and closed depending on the performance. By keeping them open, closed, or partially opened, the hall is "tuned" to fit the type of performance at hand.


Emilie and Walter Spivey were prominent citizens in the southern crescent area of Atlanta. The Spiveys made a fortune developing the Lake Spivey and Lake Jodeco areas. They wanted to give back to the community in a resounding way. Emilie Spivey had always been a patron of the arts and she was an organist. She also loved the wooded grounds of Clayton College. Walter approached the school with the idea of a concert hall. Emilie was the brains behind the idea. She insisted on hiring architects who understood music, an acoustician, and her own personal decorator to insure that music would be heard perfectly and that the surroundings would be as beautiful as the music the audience was hearing.

Neither of the Spiveys lived to see the hall, they did not even live to see the groundbreaking. But the plans that were set forth were carried out completely.

Spivey's doors opened late in 1991. The organ was not complete and added until 1992. The instrument was built in Padua, Italy by Fratelli Rufatti, then disassembled, and shipped piece by piece to Spivey Hall. The builder traveled to Spivey Hall to reassemble his masterpiece. The organ has 4,413 pipes. I have attended an organ program at Spivey Hall -- the sound is amazing.

Yesterday the Fayette Photo Club met to spend a couple hours inside Spivey Hall photographing what ever caught their eyes. One of the two hall pianos was on stage (I forget if it was Emilie or Walter --- the pianos share the names of the Spiveys). There was much to catch the eye --- Corinthian columns decorated in gold leaf, shining brass handrails, beautiful wrought iron panels, chandeliers, the organ, the piano, etc.


Of course, you are drawn to the piano on stage. I took some photos of the keys - a nice macro across the keys, looking out to the audience and the spotlight in the upper right of the photo. Also the inside of the piano was a draw. The lid was open and you could see all the workings on the inside. I took a couple macro shots there.

One of my favorite shots of the piano shows it alone on the stage in the spotlight. In another photo with the piano, I had my daughter sit at it and then slowly get up to leave the stage. The photo shows an interesting blur, I had the shutter set for an eight -second exposure. The shot of the piano in the spot was also an eight-second exposure. I took many shorter and some longer exposures. It was fun to play with the light. Another setting I played with yesterday was the white balance. Most of my shots I settled on fluorescent as my choice. This gave me a nice bluish spot and a warm glow on the upper portion of the organ. The tungsten setting (which I used a lot also) gave just the bluish cast to the whole photo.

Not only did I have the Canon XTi with me (I was using both of my Tamron lenses, the 18-250mm and the 14mm wide angle) I had the Canon S2 IS and took some great macros with that camera. One of my favorites is of the little figure decorations around the bottom of a vase. The macros of reflections in those super, high-polished brass handrails were also interesting and made for good abstracts.

It was a fun time and a great stretch to look for the unusual shots. It was also a treat for us for the people at Spivey Hall to allow us to come there and explore. To learn more about Spivey Hall, perhaps to check the schedule for a concert, check their website www.spiveyhall.org.

Blog Top Sites

Arts Blogs