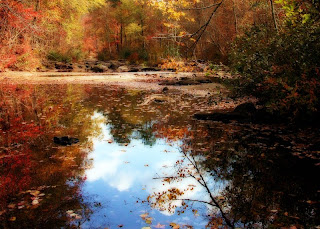
While I was preparing class materials one day last week I happened upon directions for The Orton Effect with Photoshop Elements. Hey! I have Elements - I wanted to give it a try.
The Orton Effect is a photographic technique named after Canadian photographer, Michael Orton. He developed a "look" by sandwiching two photos (he was using slides) of the same image to give a dreamy effect. The first image is sharp but overexposed. The second image is out of focus and slightly overexposed, but not as much as the sharp version.
Here are the steps to get this look for your photos. I am using Photoshop Elements. I have seen steps posted on the internet for a how-to-do with Picasa. First ,you have to decide what photo you wish to use. I have found that landscapes - especially those with a lot of foliage, trees, sunlight, and even fall colors -- take on a Maxfield Parrish type of a look. The look also reminds me of diffuse glow -- but not exactly.
Ok, so you have your photo selected. Create a duplicate copy and name this one "Sharp." (I usually never take the time to name layers --- doing this I did to keep them straight.) Create a copy of the sharp layer, it will be named "Sharp Copy" by default. Change the blending mode (that pull down menu in the layers palette where you see the word "normal") to "screen." This will lighten the photo.
After the "sharp copy" has been lightened, you need to merge the two layers. Right click on the "sharp copy" and select merge down from the menu that appears. Make a duplicate layer again, this time name it "Out of Focus." Go to the Filter section, choose Blur, and go to Gaussian Blur. Elements gives you some control here over how much the photo is blurred. The instructions I found suggested blurring to leave visible shapes but no detail.
Once you have your blur level selected head back to the blending mode in the layers palette and select 'multiply.' You can change the appearance of the final product in a couple different ways. You could start with adjusting the opacity of the out of focus layer. Another photo I worked on over the weekend, I desaturated the sharp layer, and I did this after I had completed the entire process. It gave my photo an interesting look. You could tweak this process in many ways to get something that you really like.
There are some other examples of the Orton Effect on my Flickr site. Also, there are some Lensbaby photos. Yes! The Lensbaby arrived yesterday; more on the Lensbaby later.

No comments:
Post a Comment